How to Remove Stains from Marble Countertops

If your marble countertop has a stain, don’t panic. In this article, we explain how to remove stains from marble countertops and keep your countertops looking new.

Marble countertops bring timeless elegance to any kitchen or bathroom, but their natural beauty comes with unique care requirements. Unlike harder stone surfaces, marble's calcium carbonate composition makes it more susceptible to staining and etching. The good news? 

Most marble stains can be successfully removed with the right approach and materials.

Understanding how to properly treat different types of stains helps preserve your marble countertop's appearance and extends its lifespan. This guide covers proven methods for removing common stains while protecting your marble investment.

Understanding Marble and Why It Stains

Marble forms from limestone subjected to heat and pressure over millions of years. This process creates the beautiful veining patterns we love, but also leaves marble with a porous structure that readily absorbs liquids. Additionally, marble's calcium carbonate composition reacts with acids, causing permanent etching that appears as dull spots on the surface.

The key to successful stain removal lies in identifying whether you're dealing with a stain (discoloration absorbed into the stone) or an etch mark (surface damage from acid). Stains typically darken the marble and can often be removed, while etch marks appear as light spots and require professional polishing to repair.

Identifying Common Types of Marble Stains

Different stains require different treatment approaches. Here are the most common types you'll encounter:

Organic Stains

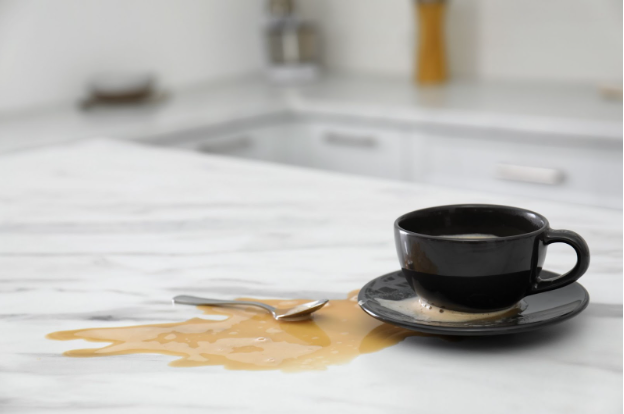
These result from coffee, tea, fruit juices, wine, or food spills. Organic stains usually appear brown, yellow, or pink and penetrate into the marble's pores. Fresh organic stains respond well to treatment, while older stains may prove more challenging.

Oil-Based Stains

Cooking oils, butter, cosmetics, and similar substances create darker stains that spread outward from the original spill point. These stains often appear slightly raised and feel greasy to the touch.

Rust Stains

Metal objects left on wet marble surfaces create orange or brown rust stains. These can be particularly stubborn and may require multiple treatment attempts.

Ink Stains

Pen marks, markers, and similar stains usually appear as dark spots on the surface. Fresh ink responds better to treatment than dried, set-in marks.

Water Stains and Mineral Deposits

Hard water leaves white, chalky deposits on marble surfaces. While not true stains, these mineral buildups can dull the marble's appearance and require specific treatment.

Biological Stains

Mold, mildew, and algae create dark, often fuzzy-looking stains in damp areas. These require disinfecting treatments to eliminate both the stain and the underlying organism.

Essential Supplies for Stain Removal

Before beginning any stain removal process, gather these materials:

Basic Supplies:

  • Baking soda
  • Hydrogen peroxide (12% strength)
  • Plastic wrap
  • Masking tape
  • Soft cloths or paper towels
  • Mild dish soap
  • Rubber gloves

Specialized Materials:

  • Acetone (for paint and ink stains)
  • Mineral spirits (for oil-based stains)
  • Ammonia (for biological stains)
  • Fine steel wool (000 grade)
  • Plastic scraper or putty knife

Safety Equipment:

  • Ventilation fan or open windows
  • Eye protection when using chemicals
  • Non-abrasive cleaning cloths

The Poultice Method: Your Primary Tool

Most marble stains respond to poultice treatment. A poultice combines an absorbent powder with a liquid to draw stains out of the marble's pores. This method works like a magnet, pulling the staining material to the surface as the liquid evaporates.

Basic Poultice Recipe

For General Stains:

  1. Mix 1 tablespoon baking soda with enough water to form a thick paste
  2. The consistency should resemble peanut butter or thick pancake batter
  3. Add liquid gradually to avoid making the mixture too thin

For Organic Stains:

  1. Mix 1 tablespoon baking soda with 12% hydrogen peroxide instead of water
  2. Create the same thick paste consistency
  3. This combination provides extra lifting power for stubborn organic stains

Applying the Poultice

  1. Clean the area with mild soap and water, then dry completely
  2. Test in an inconspicuous area first to ensure no adverse reactions
  3. Apply the poultice in a layer about 1/4 inch thick, extending beyond the stain edges
  4. Cover with plastic wrap and tape down the edges to prevent drying
  5. Allow 24 hours for the poultice to work
  6. Remove the plastic and let the poultice dry completely
  7. Scrape off the dried poultice with a plastic scraper
  8. Rinse thoroughly with clean water and dry with a soft cloth

Specific Stain Removal Methods

Removing Organic Stains (Coffee, Wine, Fruit)

  1. Clean the area with mild soap and warm water
  2. Apply a hydrogen peroxide and baking soda poultice
  3. Cover and let sit for 24 hours
  4. For stubborn stains, repeat the process up to three times
  5. Rinse thoroughly and dry completely

Treating Oil-Based Stains

  1. Blot excess oil immediately without spreading
  2. Clean with a degreasing dish soap solution
  3. Create a poultice using baking soda and mineral spirits
  4. Apply, cover, and let sit for 24 hours
  5. Remove and repeat if necessary

Addressing Rust Stains

Rust stains require careful handling as they can be permanent:

  1. Never use bleach or acid-based cleaners on rust
  2. Apply a paste of baking soda and water
  3. For stubborn rust, use a commercial rust remover designed for marble
  4. Always test in an inconspicuous area first
  5. Consider professional treatment for severe rust stains

Handling Ink Stains

  1. For fresh ink: Blot immediately with acetone on a soft cloth
  2. For set-in ink: Create a poultice with baking soda and acetone
  3. Apply for 24 hours under plastic wrap
  4. Rinse thoroughly after removal
  5. Ensure adequate ventilation when using acetone

Eliminating Water Stains and Mineral Deposits

  1. Mix equal parts water and white vinegar in a spray bottle
  2. Note: Use sparingly and test first, as vinegar is acidic
  3. Spray lightly and wipe immediately with a soft cloth
  4. For heavy buildup, use a marble-specific cleaner instead
  5. Rinse thoroughly and dry completely

Removing Biological Stains (Mold, Mildew)

  1. Mix 1/2 cup ammonia in 1 gallon of water
  2. Alternative: Use hydrogen peroxide instead of ammonia
  3. Never mix ammonia and bleach - this creates dangerous gases
  4. Apply with a soft cloth and let sit for 10 minutes
  5. Scrub gently with a soft brush if needed
  6. Rinse thoroughly and ensure good ventilation

What NOT to Do When Removing Marble Stains

Avoid These Common Mistakes:

  • Never use vinegar, lemon juice, or acidic cleaners - these will etch the marble
  • Don't use abrasive scrubbers or steel wool - these scratch the surface
  • Avoid generic bathroom cleaners - most contain acids that damage marble
  • Don't let spills sit - immediate cleanup prevents deep staining
  • Never use bleach on rust stains - this can set the stain permanently
  • Don't mix different cleaning chemicals - this can create dangerous reactions

When to Call Professionals

Some situations require professional intervention:

  • Deep etching that appears as dull, light-colored spots
  • Extensive staining covering large areas
  • Repeated treatment failures after multiple attempts
  • Valuable or antique marble where mistakes could be costly
  • Uncertain stain identification when you're unsure of the proper treatment
  • Structural damage like cracks or chips accompanying the stain

Professional stone restoration specialists have access to commercial-grade products and equipment that can address problems beyond DIY capabilities.

Preventing Future Stains

Prevention remains the best strategy for maintaining marble countertops:

Daily Maintenance

  • Wipe spills immediately, especially acidic substances
  • Use coasters under glasses and bottles
  • Clean with pH-neutral stone cleaners designed for marble
  • Dry surfaces after cleaning to prevent water spots

Weekly Deep Cleaning

  • Clean thoroughly with marble-specific cleaner
  • Check for new stains or etching
  • Remove any buildup from soap or cleaning products

Protective Measures

  • Seal marble annually or as recommended by your installer
  • Use cutting boards to protect from knife scratches
  • Place trivets under hot cookware
  • Consider marble-safe protective films for high-use areas

Sealing Your Marble

Proper sealing creates a barrier that slows liquid absorption, giving you more time to clean spills before they stain:

  1. Test current sealing by dropping a small amount of water on the surface
  2. If water absorbs quickly (within 10 minutes), resealing is needed
  3. Clean thoroughly before applying new sealer
  4. Choose a penetrating sealer designed specifically for marble
  5. Apply according to manufacturer directions
  6. Allow proper curing time before normal use

Maintaining Your Investment

Marble countertops represent a significant investment in your home's beauty and value. With proper stain removal techniques and preventive care, they can maintain their elegance for decades. Remember that each marble slab is unique, with different porosity and mineral composition affecting how it responds to stains and treatments. When in doubt, consult with marble care professionals who can provide guidance specific to your stone. Your countertop supplier should give you specific recommendations on cleaners and stain removers to use.

Regular maintenance, prompt stain treatment, and professional care when needed will ensure your marble countertops continue to be a source of pride in your home. The effort invested in proper care pays dividends in preserved beauty and lasting value.

Countertop Material Quiz

Considering different countertop materials like marble, granite, quartz, and quartzite? Take our quiz to help you decide which countertop material will fit your lifestyle.

Read More

Cleaning and Care Guide for Different Countertop Materials

Get cleaning and care tips for marble, granite, quartzite, soapstone, porcelain, and onyx countertops to keep your countertops looking brand new.

Read More

contact Ap Marble & Granite.